Growing seedlings with compostable coffee cups
16.2 years ago cheap, compost, indoor seed starting, tomato

Occasionally at work I get a craving for some hot chocolate. When I do, I reach for a company provided compostable coffee cup (I know I should bring in my own cup, but I did say “occasionally”). When I am done with my delicious beverage, I simply dispose of them in the proper “compostable” reciprocal. Last week was different, with my recent frustration with the durability of some of my newspaper pots, I got the idea to extend the life of these cups a little longer and grow some seedlings in them.
This particular type of cup breaks down in 47 days, unless you happen to leave one half filled with liquid overnight on your desk, in that case they magically breaks down a few minutes after you walk out the door. I am planning on growing my tomatoes and peppers in these cups and plant them directly into the soil. To help with more freedom in root growth I will cut out the bottom of the cup. I will let you know how it works.
Now if your work does not use these cups, never fear many coffee shops are featuring these same type of cups with the purchase of an overpriced hot beverage.
Tags: cheap, coffee grounds, compost, garden seeds, led, outdoor plants, pepper plants, tomato plants, vegetables
Computerized grow box update
16.2 years ago cilantro, computer, computer power control, cucumbers, electronics, indoor growbox, tomato

Haven’t mentioned the computerized grow box for a while, so think it is a good time for an update. The moisture sensor corroded away, but have plans to make a much more beefier one. With the exception of the hard drive failure, the basic functionality of the computerized grow box has been excellent and the plants have been thriving. The only physical improvement I have made is adding some particle board to the top and side (salvaged from packaging material from some furniture we ordered) of the grow box. This helps retain heat and allows the access panel to stay put without requiring tape and/or bags of coffee grounds propped against it. I also mounted the LCD panel securely to the top of the box.

They say as your paycheck increases, somehow your expenses follow suit. I have a feeling same concept applies for grow boxes. As the computerized grow box is about four times bigger than my PC grow box it has quickly getting pretty crowded waiting for the time I can move my summer vegetables outside. I am planning on doing some reorganization this weekend to clean things up a little bit but still going to be pretty tight quarters.

The current inventory in the grow box are 12 tomato plants (was 18 but gave six away at a recent gardening talk), 2 cucumber plants (had one fatality from Peat/WonderSoil experiment, looks like Peat lost), 6 pepper plants (need transplanting), and a cilantro plant which was the source of my first harvest of the year.
Now just hoping Punxsutawney Phil is wrong and we really don’t have six more weeks of winter, though with the snow we got two days ago and the current temperature outside, I think he might be right.
Tags: cheap, cilantro, coffee grounds, garden seeds, growbox, outdoor plants, pepper plants, tomato plants, vegetables
Cheap DIY fogger aeroponic system
16.2 years ago aeroponics, cheap, hydroponics, indoor growbox, indoor seed starting

In my post about basic the basics of hydroponics I mentioned the potential high cost of entry but with a little creativity this can be avoided. I went through this exercise and here is a pretty inexpensive way to try out hydroponics without having to spend hundreds on a prebuilt system. The solution I came up with cost me $1.00 to setup though I did have many of the items on hand, if I had to purchase everything cost would be in the $10-15 range.
Supplies
- Small shoebox sized plastic tub /w lid — (I purchased a clear generic one from Home Depot for $1.00)
- 2 inch hole saw and drill
- 6 — Empty Trix yogurt cups (can be any brand as long top is approx 2 in diameter)
- Duct tape (no one should be without this)
- Pond fogger – single disc (can be found on eBay for less than $10, I had one from humidifier)
- Perlite
- Water (tap water is fine, fancy bottles work as well)
Assembly
From looking at the supplies this might be able to guess the construction steps, but I will list them out anyway.
- Take lid and add drill six 2-inch holes using hole saw. If the tub is not made of rubbery material be sure to take your time to slowly create the holes to prevent cracking/shattering. You can also do this with a utility knife but for non-rubber lids I highly suggest against it if you like your fingers.
- Test fit your cups and ensure they fit snuggly, if they do not quite fit you can use some sandpaper to expand the holes slightly
- Remove cups and cut (utility knife) or burn (soldering iron) 1/4 in lines in a pattern similar to the
 figure to the right to ensure extra support and prevent the medium (perlite) from falling through. WARNING: Burning plastic emits toxic fumes and should be done (if at all in a well ventilated area) Knifes are sharp and can cut fingers so if you not careful. I would recommend buying 2 inch hydroponic net pots which can be purchased for about $0.25 each online, which I would have done if I wasn’t so impatient.
 - Given that nutrients+water+light=algae, be sure that your box is as light tight as possible. If you container is not clear like mine you should be in good shape, otherwise cover your box with duct tape or spray paint the box using plastic adhering paint. I would recommend keeping a small vertical line exposed so you can get a quick look at water condition and level without having to disturbing the plants.
- Fill cups with perlite 4/5 full (some expansion may occur)
- Pour water into cups until reservoir is full
- Dump water out water
- Repeat steps 4-6 until water appears clear
- Cut small hole in the corner of the lid and feed power line to fogger through
- Put fogger in tub and fill with water until it is about 1/2 inch above fogger
- Replace lid and plug in fogger and enjoy the mysterious fog

What can I grow with this?
The short answer is anything. Self regulation wicking properties of perlite it should keep most plants happy for some time. The major limitation you may see is some types of plants will outgrow this setup and will require transplant outside in soil or in a larger hydroponic setup (coming soon). Though with careful selection of plants and frequent harvesting you can grow many plants to maturity in this small system. It did not occur to me until after I completed the project but the size and spacing is pretty close to that of an AeroGarden so plants like greens, herbs, strawberries, cherry tomatoes, peppers would do well in this system. For starting plants you can simply drop a few seeds, cover with some perlite and a clear plastic container (I used empty applesauce cups, but bottom of water bottles also would work well) You may also add seedlings by carefully placing in them in the damp perlite.

What about nutrients?
Keeping the project cheap I opted to use some balanced liquid plant fertilizer I use for my seedling/indoor plants. I mixed it at the recommendation it stated for indoor watering (2 pumps per gallon) I noticed it did not contain any Magnesium I also added a half a teaspoon of Epsom salt. After a couple weeks empty contents and replace with water let run for about an hour to allow sediments to clear up and then empty contents. This is good for your plants but also can help keep the disc on your fogger clean. Refill with water and nutrient mix and repeat. This will work for most plants in vegetative state of growth though if you want your plants to move to a flowering state (peppers, tomatoes, etc) I would recommend purchasing specific hydroponic solution for flowering plants.
For a very small investment you can have your own hydroponic system and experience the benefits of growing without soil.
Tags: cheap, garden seeds, herb garden, outdoor plants, pepper plants, strawberry plants, tomato plants, vegetables
Gardening products I would buy if I wasn’t so cheap
16.2 years ago cheap, compost, germination, indoor seed starting, tomato
Today I got my Gardener’s Supply Companycatalog, this particular catalog is dedicated to items to assist you with your gardening habit. You should be able to guess from this site I do my best to resist buying anything for the garden I absolutely need, otherwise I make a cheaper alternative. Well the point of this post is to show what I would like to get if I wasn’t as disciplined.
 |
They sell these Accelerated Propagation System (APS) seed starting kits which have all the basics you expect from a seed starting kits you would find at your local garden store. They include 6 to 40 cells to plant seedlings and a clear plastic dome to help raise the humidity to provide extra moisture for the tender seedlings. The bonus in this setup is it also contains a reservoir which holds enough water to keep them moist for up to a week. With the help of an elevated platform and capillary matting provides just the right amount of water to your plants. At just $19.95 for the 40 and 24 cells sizes this is one purchase I am still considering, since I never have finished my automatic watering system on my computerized grow box and this makes much better use of space than my plastic tub, newspaper pots, and daily watering method I am doing now. |
 |
Eco-Friendly Cowpots basically planting pots made as a byproduct of processing cow poo. The poo is dried, composted and mixed with natural fibers creating a completely biodegradable pot which holds up well during growth and transplanting but biodegrades in the soil after several weeks. I watched an episode of Dirty Jobs which went through the whole process and it was very interesting and environmentally conscience but, unfortunately due to the price tag (about $1 a pot) these are a little over my budget since my newspaper pots are free. |
 |
Gardener’s Revolution Planter – You have probably seen something similar advertised between gardening shows on HGTV (Topsy Turvy) , I know my daughter has and has been talking about growing tomatoes upside down for some time now. She even on her own came up with a ingenious design to do this (not 5 gallon bucket) which I will write-up when we get around to that project. In case you were wondering the improvement this year (or compared to the TV advertisement) it is the addition of a 1 gallon water reservoir which slowly releases water to the plant as neededSelf watering must be a big seller this year since there are also many other variances of self watering pots in many shapes and sizes with designs similar to the original (to my knowledge) the EarthBox. |
 |
Now definitely in the gadget department the Push-Button Kitchen Scrap Composter can take your everyday kitchen scraps and turn them into compost in less than 11 days. The concept on this one is pretty simple:Food + Heat + Spinning = Compost
Of course it crossed my mind of creating something similar myself, but probably would end up burning down the house or if I was lucky just launch partially composted food across the living room at 50 miles per hour. Given the $299 price tag seems like I will be stuck to waiting 3-6 months for my compost to be created. Though it would be much more convenient than walking through the snow to add kitchen scraps to the compost. |
Tags: cheap, compost, garden seeds, growbox, led, outdoor plants, tomato plants, vegetables
Computer controlled grow box – Part 1
16.3 years ago cheap, computer, electronics, indoor growbox, PC thermometer

The Idea and Design
My PC Grow box was very effective though it did have some shortcomings along with my desire for tinkering caused me to create a new version code named “Project Everbearing” after the test subjects for the project, several Everbearing strawberry plants I propagated from my garden last Summer/Fall. The specific shortcomings I wanted to overcome were temperature control and limited size. My grow box has to live in my garage so on cold nights the temperatures can fall low enough to kill my summer seedlings (tomatoes/cucumbers) Size is an easy fix just make it bigger though it is more difficult to keep a larger grow box warm and still well lit.�
My solution to both of these problems was the addition of a computer to the system. First computers generate heat, using this along with computer controlled fans and incandescent lights (heater) allow me to regulate the heat to my desired levels. This is the point a normal person may have just stopped, but I am far from normal and decided a few more features, which I will explain more below.


The Structure and Insulation
First comes the structure, upon inheriting a set of shelves from my sister, we ran out of room for some of our existing storage shelves (see above), though we used the buckets to store loose toys on our new shelves we had the structure of the old one sitting in the garage for some time. After many passes by in the garage not knowing what do do with this shell, it finally came to me that this would be perfect for my new grow box, (Reduce/Reuse/Recycle) in action. The only customization required was the removal of a couple of the wooden dowels and I was ready to add some hardware. Of course you could do the same thing with an old bookshelf, cabinet or just with construct your own frame with a 12”X1”X8’ foot board cut in two along with two 1”X1”X8’ pieces of lumber cut into two. Screw one 1”X1” in each corner and should should have a pretty solid frame. For the top I used pegboard mainly because I bought a 4’ by 8’ sheet when I only needed half of it but worked really good to use zip-ties to secure various components and provides decent airflow between the computer and growing areas.
Second comes insulation, after some not so careful calculations and measurements I determined I could cover the 3 exposed areas with 2 sheets of 2’ by 4’ sheets of insulating Styrofoam. I glued and taped (duct tape of course) the Styrofoam which was cut using a utility knife and straightedge to cut to size making sure I made the top straight and flush. I then created an exactly copy of the other side and one more piece for the top. Using a long strip of duct tape I created a hinge for the top and glued side of the box. The last piece I simply fit into place using a tool box to ensure a tight fit but also allows easy access to plants when needed.
The Lighting
I went cheap on the lighting taking from the success of the PC grow box I decided to go with a similar setup using $2.00 home depot wired sockets hooked up to an couple old computer power cords. I went with two 24 watt CFL bulbs and one incandescent bulb. Though the incandescent is not as efficient and the CLFs it does provide a full spectrum of light and a little extra heat which the box can use in the many times cold garage where it lives. The CFLs and incandescent exist on two separate circuits so they can be controlled independently by the software.
The Software — Grow box brains
Now I know all of this could be done with a Basic Stamp or Arduino pretty easy, but I wanted the ability to track history and have a decent user interface to look at, so I wrote a windows form application using C#. To cover the basic functionality of temperature control I used the parallel port outputs hooked up to the computer’s parallel port to give the software the ability to turn the lights on and off. By configuring a “sunset” and “sunrise” time which I am in complete control over the lights will turn on and off as appropriate. I added some logic to ensure the plants stay at a comfortable temperature (thresholds configurable) by turning on the incandescent bulb when it is too cold and an exhaust fan when it gets too hot. In order to allow the computer to know these temperatures I used a PS2 controller to create two temperature sensors one for the area the plants are growing and another for the top area where the CPU resides (computer was too old to have onboard temperature sensor)
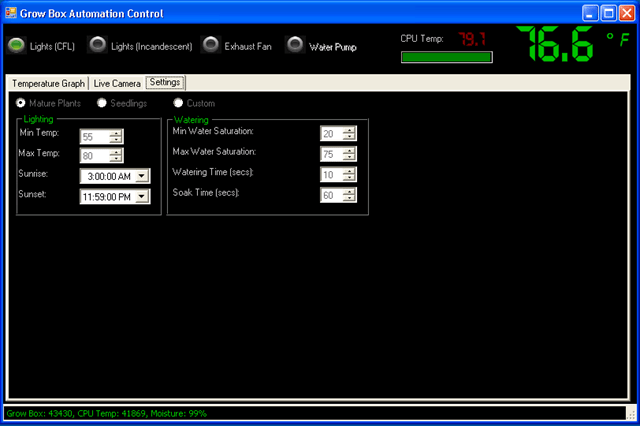
My daughter thought it would be cool if we have some sort of automatic watering system. I agreed, so I added a moisture sensor and created an algorithm to periodically check the moisture level and activate a water pump to add water until it reaches the specified moisture level. I still need to buy and hookup the pump but coding portion is complete and tested.
I live in the Pacific Northwest it rains a lot and can get cold in the evenings and I don’t want to trek out to check on my plants. solved this by adding the computer to my Wi-Fi network now I can take look at them by connecting to the machine wirelessly and see how they are doing through it’s webcam. I also take periodic pictures of the plants so I can create cool time-lapse videos of progress like the one below. I also have the ability to browse through pictures taken at specific time periods.

Finally to store all of this data I installed SQL Server 2005 Express (free) which allows me to track historical data of the conditions and images over time. If you have data, you definitely need some graphs. Being too lazy to do this graphic work I leveraged ZedGraph (free) to allow some visual tracking of temperatures and moisture content.

Features for future versions (Beta 2?)
- Finish automated watering
- Add automated red LED lights for flowering stage
- Install LCD Panel
- Make box look better (real door which does not require tape to open/close)
- Create single USB controller for lights/sensors
- Better/additional camera
Video of grow box “booting” up, personally I like the flashing lights when the computer sends signal through the parrallel port. If you are old enough to ever have a printer that used a parallel port this is when it would make its annoying sound letting you know it was alive.
Updates:
Computerized Grow Box Update #1
Tags: arduino, cheap, garden seeds, grow lights, growbox, led, outdoor plants, strawberry plants, tomato plants, vegetables
The most profitable plants in your vegetable garden
16.3 years ago cheap, cilantro, garlic bulbs, organic, seedling, seeds, vertical gardening, winter garden

Many vegetables can be expensive to purchase by growing the most expensive vegetables in your garden and buying the least inexpensive vegetables at your grocery store you can easily help drop your food budget. This especially important for people like me with very limited space to grow everything that I consume.
It may be impossible to put a price on the satisfaction of bringing in a basket of produce fresh from your garden. As well as the enhanced flavors from having truly fresh produce from your garden compared to that of your local supermarket. Though when I was harvesting my potatoes this summer with my daughter I did have the thought, Would it have been smarter for me to grow something else in this space? I estimate out of the 4-5 square feet I used for these plants I probably got about $4-5 worth of potatoes.
I did a little research first to determine yields of various plants per square foot and secondly what the value (organic supermarket prices USD) of the yielded produce at harvest. Given I am a city dweller with a fairly small footprint for my vegetable garden (about 30-35 square feet) making decisions on what to buy at the supermarket and what to grow in the garden may be a huge money saver with just a few dollars invested in some seeds for your vegetable garden
Now from the results below you can see the winners for the most produce value per square foot are many of the leafy green vegetables/herbs (cilantro, lettuce, chives, dill, Swiss chard) next comes many of the larger vine plants (tomatoes, squash, pumpkins, peas) with many of the root plants taking up the rear. Now much of this makes sense where many of the vine plants grow on trellises and are allowed to spread, which I guess is sort of cheating the square foot rule but I will let it slide. Compared to the root plants whose production is entirely dependent on the space allowed in square footage they have to grow as well as these are normally inexpensive produce items to begin with.
| Vegetable | USD Value/SF |
| Cilantro | $ 21.20 |
| Arugula-Roquette | $ 20.92 |
| Green Salad Mix | $ 17.55 |
| Chives | $ 16.40 |
| Dill | $ 16.40 |
| Lettuce | $ 16.20 |
| Tomato, Cherry, small & medium | $ 15.57 |
| Turnip | $ 9.90 |
| Tomato, large | $ 9.50 |
| Squash, Winter | $ 8.40 |
| Tomatillo | $ 8.00 |
| Cucumber | $ 7.74 |
| Basil | $ 6.63 |
| Radish, Red | $ 6.22 |
| Pumpkin | $ 6.20 |
| Chard, Swiss | $ 6.14 |
| Celery | $ 6.00 |
| Squash, Summer | $ 5.96 |
| Choi | $ 5.70 |
| Peas, Snow | $ 4.50 |
| Pepper, Jalapeno | $ 4.50 |
| Squash, Summer, Zucchini | $ 4.17 |
| Onion, Bunching | $ 4.14 |
| Pepper, Bell | $ 3.60 |
| Brussels Sprouts | $ 3.59 |
| Carrots | $ 3.56 |
| Rhubarb | $ 3.25 |
| Squash, Winter, Butternut | $ 3.20 |
| Kale | $ 3.07 |
| Grass, Lemon | $ 3.00 |
| Peas, English | $ 3.00 |
| Onion, Bulb | $ 2.63 |
| Radish, White | $ 2.60 |
| Bean, Bush | $ 2.51 |
| Peas, Edible Pod | $ 2.50 |
| Artichoke, Globe | $ 2.40 |
| Cabbage, Chinese Napa | $ 2.24 |
| Squash, Winter, Delicata | $ 2.10 |
| Spinach, Spring/Fall | $ 1.80 |
| Leeks | $ 1.75 |
| Potatoes | $ 1.50 |
| Parsnips | $ 1.50 |
| Garlic | $ 1.37 |
| Squash, Summer, Yellow | $ 1.34 |
| Parsley | $ 1.31 |
| Corn | $ 1.25 |
| Squash, Winter, Acorn | $ 1.20 |
| Squash, Winter, Hubbard | $ 1.20 |
| Eggplant | $ 1.10 |
| Greens, Mustard | $ 1.10 |
| Rutabaga | $ 1.00 |
| Beet | $ 0.89 |
| Cabbage, Savoy | $ 0.80 |
| Broccoli | $ 0.80 |
| Kohlrabi | $ 0.75 |
| Cauliflower | $ 0.60 |
| Broccoli, Chinese | $ 0.60 |
| Cabbage | $ 0.50 |
Sources: http://www.mcgoodwin.net/pages/ppatch.html for plant yield information, http://shop.safeway.com for current produce prices
Now even with this information I will still plan on growing some onions and garlic since I more than likely would be forced to use dehydrated alternatives due to being too lazy to drive to the supermarket to buy fresh varieties. Though I may be adding some more herbs/greens to my garden this year.
One important thing to remember is you still have to eat the vegetables, throwing $20 worth or arugula or cilantro into the compost bin is not exactly a sound investment. You can also get higher yields by growing vertically, but don’t forget those tall plants produce a larger shadow so you may still need some extra ground space to support these alternate growing methods.
So go out and get some cheap vegetable seeds (or in many cases free) and plant some profitable vegetables in your backyard/patio garden this spring.
Tags: cilantro, compost, garlic bulbs, herb garden, organic vegetables, outdoor plants, pepper plants, tomato plants, vegetables


