Remote monitoring of computerized grow box
16.1 years ago computer, indoor growbox

My wife saw this wireless indoor/outdoor thermometer on clearance at Eddie Bauer and knew this was something I could use. I simply put the wireless sensor in the computerized grow box and instant temperature monitoring where at a quick glance I can be sure my summer vegetables are toasty warm in the garage. Sure, I could connect to the machine remotely, or look at the backup digital thermometer inside the box, or check the LCD panel on the box but this definitely gives some piece of mind at a quick glance. This may be a somewhat lower tech solution, but it works. At least until I get around implementing my other ideas and then I can actually know what the temperature is outside.
[As you can see from the indoor temperature we are not just cheap in the garden.]
Tags: cheap, growbox, vegetables
Growing in dirt outside
16.1 years ago cilantro, cucumbers, garlic bulbs, indoor growbox, onions, outdoor seed starting, peas, tomato

I haven’t done many posts in a while about regular old gardening in actual dirt so figured a good time to do an update. Though I enjoy indoor seed starting in my LED grow box and computerized grow box, some plants need to be started outdoors. Today my daughters and I planted the last these plants for fall outdoor planting.
A few weeks ago, we planted garlic, onions, spinach, and peas which are doing well. I love growing these plants no matter how late your spring comes these plants are hardy they are pretty hard to kill off.
Today we planted carrots, lettuce, and cilantro leaving a little space left to do some successive cilantro planting in a couple weeks to ensure I have enough for salsa by the time the tomatoes are ready this summer.
Speaking of tomatoes, they along with jalapeño peppers, and cucumbers (actually flowering) are doing great in the computerized grow box. In the LED grow box I have pumpkin, Black Eyed Susan, small sunflowers, and Purple Coneflowers using Grodan Gro-Blocks.
Nice to finally see some stuff in the ground though still hoping the weather gets better before my cucumbers try to escape the grow box.
Tags: cheap, cilantro, garden seeds, garlic bulbs, growbox, led, outdoor plants, pepper plants, salsa garden, tomato plants, vegetables
How to make a cheap soil moisture sensor
16.1 years ago cheap, electronics, water

Soil sensors can be pretty expensive to purchase but a few minutes and a few cents worth materials around your house you can make your own accurate cheap soil moisture sensor.
UPDATE: Though this still a great sensor, check this post for the latest version of a more heavy duty soil moisture sensor.
I mentioned in a previous post that my previous soil moisture sensor did not hold up in my automated grow box update, so I needed to make a new one. After a little research there was the classic science class method of creating a homemade sensor by simply putting two galvanized nails in the soil and measuring the resistance between them. A major problem with this solution is the soil composition can significantly vary the resistance and keeping the spacing between the nails could be troublesome.
After a little more research I came across the method that has been working well for over 50 years. This method includes taking two metal probes and inserting them into a gypsum block and measuring the resistance between them. The gypsum absorbs the water and provides a decent range of resistance and moisture measurement.
Unfortunately I was fresh out of gypsum (sort of), so I looked around the garage and found a good substitute, Plaster of Paris. Plaster of Paris is created by heating gypsum to around 150 degrees where it becomes calcium sulfate hemihydrate. After adding water and allowing to dry it magically turns back into gypsum with the added bonus it also has the ability to mold to any shape I could come up with . On to construction…..

Materials for cheap soil moisture sensor:
- 1 tsp Plaster of Paris
- 1/2 tsp cold water
- Disposable cup for mixing
- wide straw (I used one from McDonalds, but most fast food straws should work)
- 2 small pieces of metal (I used wall hangers, but nails, paper clips, etc will work as long as they can fit inside the straw with room for plaster to form around)

I straightened out one end of both wall hangers the best I could with some needle nose pliers. I then carefully positioned them approximated 15mm apart, the exact measurement is less important though if you are creating multiple sensors I would recommend making them the same gap to ensure consistency of measurements without having to individually calibrating each sensor. I then used some hot glue (insulator) liberally at the top and at the bottom just enough to keep it in place during while pouring the plaster and while the mold solidifies.

Now insert your secured metal probes into the straw, ensuring that both metal probes are equal distant from the sides of the straw. The great thing about the wall hangers is they do this automatically due to their wedge shape at the top. Once you have them centered apply gobs of glue to keep the probe in place but also to seal any gaps between the straw and the bottom of the straw. This needs to be water tight since this will be the bottom our your mold.

Prepare the Plaster of Paris according to the instructions on the box. On my box it said 2 parts mix to 1 part colder water. Given the small size of the mold 1 tsp of mix and 1/2 tsp of water which gave you more than enough to make one sensor. I used a bamboo skewer to stir since I would have gotten in trouble for trying to use our new silverware.
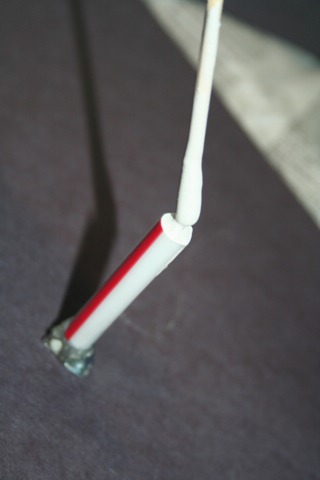
Now it is time to pour your mold, depending on how steady your hands are you should be able to pour the plaster right into the top of the straw. Fill about 1/4 of the length then tap the probe gently to help the plaster settle between the gaps. Repeat the previous step until the straw is full. If you have problems pouring you can also dip the skewer into the plaster and scrape it against the top edge of the straw. This step is optionally but I wanted to give my sensor a little point so I carefully added plaster beyond the end of the straw to provide a sharp point. Once you are done filling the straw, use your glue gun to secure the probe onto the paper you are working on and allow at least 1 hour to set.

After about an hour you can remove the bottom part of the probe. Do this by carefully cutting around the diameter of the bottom 3/4 of the straw, along with a lengthwise cut as shown in the lines marked above using a utility knife. You must be very careful in your cutting going too deep can result in cracking the plaster and you need to start all over.
Allow the plaster to dry for 24 hours and it should be ready for testing. With my probe it is essentially an insulator dry (beyond what my ohmmeter can measure) and a reading of 957 ohms when slightly damp which was a great range for measuring moisture level in my computerized grow box.

Finally, I attached attach wires to my analog measuring device (in my case a PS2 Controller) and I started getting readings. At this point you should calibrate the sensor by getting a reading with the probe dry then again when it is full saturated in water. Ironically, the probe I made was almost exactly specifications as the one I re-purposed from a cheap commercial soil moisture sensor so I didn’t even have to modify the constants on the automated computerized grow box software.
Given you can make hundreds of these things with a regular sized box of Plaster of Paris, box of paper clips and a few trips to your favorite fast food restaurant. The cost of each of these things would be pennies and given the cost of buying a commercial product seems like a very economical alternative.
Tags: cheap, growbox, vegetables
Computerized grow box update
16.1 years ago cilantro, computer, computer power control, cucumbers, electronics, indoor growbox, tomato

Haven’t mentioned the computerized grow box for a while, so think it is a good time for an update. The moisture sensor corroded away, but have plans to make a much more beefier one. With the exception of the hard drive failure, the basic functionality of the computerized grow box has been excellent and the plants have been thriving. The only physical improvement I have made is adding some particle board to the top and side (salvaged from packaging material from some furniture we ordered) of the grow box. This helps retain heat and allows the access panel to stay put without requiring tape and/or bags of coffee grounds propped against it. I also mounted the LCD panel securely to the top of the box.

They say as your paycheck increases, somehow your expenses follow suit. I have a feeling same concept applies for grow boxes. As the computerized grow box is about four times bigger than my PC grow box it has quickly getting pretty crowded waiting for the time I can move my summer vegetables outside. I am planning on doing some reorganization this weekend to clean things up a little bit but still going to be pretty tight quarters.

The current inventory in the grow box are 12 tomato plants (was 18 but gave six away at a recent gardening talk), 2 cucumber plants (had one fatality from Peat/WonderSoil experiment, looks like Peat lost), 6 pepper plants (need transplanting), and a cilantro plant which was the source of my first harvest of the year.
Now just hoping Punxsutawney Phil is wrong and we really don’t have six more weeks of winter, though with the snow we got two days ago and the current temperature outside, I think he might be right.
Tags: cheap, cilantro, coffee grounds, garden seeds, growbox, outdoor plants, pepper plants, tomato plants, vegetables
$3 LED light bulbs coming soon…
 Researchers at Cambridge University have come up with a method to significantly reduce the cost of creating LED light bulbs. LEDs use gallium nitride and requires being grown on sapphire wafers. The new technique allows growth on silicon wafer reducing the cost significantly from $28 to $3 per bulb. The big news for the bulbs is they use 12 times less energy that incandescent bulbs, last for 60 years, and they are far enough in their research that they could come to market in just a two years. Just imagine, in just a couple years you could be buying your last light bulb(s) of your life, unless you physically break them of course.
This this so exciting for indoor growing, my cheap LED grow box works great for the small space for seedlings. When I start thinking of expanding my growing area, the current LED prices make the start-up cost to illuminate a large space is considerable. Because of this I am forced to resort to CFLs as the more economical solution. With these innovations we could definately see indoor gardening much more accessible to a greater audience with this financial barrier lifted. via Gizmodo
Tags: cheap, garden seeds, growbox, led, vegetables
Gardening products I would buy if I wasn’t so cheap
16.2 years ago cheap, compost, germination, indoor seed starting, tomato
Today I got my Gardener’s Supply Companycatalog, this particular catalog is dedicated to items to assist you with your gardening habit. You should be able to guess from this site I do my best to resist buying anything for the garden I absolutely need, otherwise I make a cheaper alternative. Well the point of this post is to show what I would like to get if I wasn’t as disciplined.
 |
They sell these Accelerated Propagation System (APS) seed starting kits which have all the basics you expect from a seed starting kits you would find at your local garden store. They include 6 to 40 cells to plant seedlings and a clear plastic dome to help raise the humidity to provide extra moisture for the tender seedlings. The bonus in this setup is it also contains a reservoir which holds enough water to keep them moist for up to a week. With the help of an elevated platform and capillary matting provides just the right amount of water to your plants. At just $19.95 for the 40 and 24 cells sizes this is one purchase I am still considering, since I never have finished my automatic watering system on my computerized grow box and this makes much better use of space than my plastic tub, newspaper pots, and daily watering method I am doing now. |
 |
Eco-Friendly Cowpots basically planting pots made as a byproduct of processing cow poo. The poo is dried, composted and mixed with natural fibers creating a completely biodegradable pot which holds up well during growth and transplanting but biodegrades in the soil after several weeks. I watched an episode of Dirty Jobs which went through the whole process and it was very interesting and environmentally conscience but, unfortunately due to the price tag (about $1 a pot) these are a little over my budget since my newspaper pots are free. |
 |
Gardener’s Revolution Planter – You have probably seen something similar advertised between gardening shows on HGTV (Topsy Turvy) , I know my daughter has and has been talking about growing tomatoes upside down for some time now. She even on her own came up with a ingenious design to do this (not 5 gallon bucket) which I will write-up when we get around to that project. In case you were wondering the improvement this year (or compared to the TV advertisement) it is the addition of a 1 gallon water reservoir which slowly releases water to the plant as neededSelf watering must be a big seller this year since there are also many other variances of self watering pots in many shapes and sizes with designs similar to the original (to my knowledge) the EarthBox. |
 |
Now definitely in the gadget department the Push-Button Kitchen Scrap Composter can take your everyday kitchen scraps and turn them into compost in less than 11 days. The concept on this one is pretty simple:Food + Heat + Spinning = Compost
Of course it crossed my mind of creating something similar myself, but probably would end up burning down the house or if I was lucky just launch partially composted food across the living room at 50 miles per hour. Given the $299 price tag seems like I will be stuck to waiting 3-6 months for my compost to be created. Though it would be much more convenient than walking through the snow to add kitchen scraps to the compost. |
Tags: cheap, compost, garden seeds, growbox, led, outdoor plants, tomato plants, vegetables


