Search Results

How to make a cheap soil moisture sensor

cheap soil moisture sensor

Soil sensors can be pretty expensive to purchase but a few minutes and a few cents worth materials around your house you can make your own accurate cheap soil moisture sensor.

UPDATE: Though this still a great sensor, check this post for the latest version of a more heavy duty soil moisture sensor.

I mentioned in a previous post that my previous soil moisture sensor did not hold up in my automated grow box update, so I needed to make a new one.  After a little research there was the classic science class method of creating a homemade sensor by simply putting two galvanized nails in the soil and measuring the resistance between them.  A major problem with this solution is the soil composition can significantly vary the resistance and keeping the spacing between the nails could be troublesome.

After a little more research I came across the method that has been working well for over 50 years.  This method includes taking two metal probes and inserting them into a gypsum block and measuring the resistance between them.  The gypsum absorbs the water and provides a decent range of resistance and moisture measurement.

Unfortunately I was fresh out of gypsum (sort of), so I looked around the garage and found a good substitute, Plaster of Paris.  Plaster of Paris is created by heating gypsum to around 150 degrees where it becomes calcium sulfate hemihydrate.  After adding water and allowing to dry it magically turns back into gypsum with the added bonus it also has the ability to mold to any shape I could come up with .  On to construction…..

001

Materials for cheap soil moisture sensor:

  • 1 tsp Plaster of Paris
  • 1/2 tsp cold water
  • Disposable cup for mixing
  • wide straw (I used one from McDonalds, but most fast food straws should work)
  • 2 small pieces of metal (I used wall hangers, but nails, paper clips, etc will work as long as they can fit inside the straw with room for plaster to form around)

imageMetalGlue

I straightened out one end of both wall hangers the best I could with some needle nose pliers.  I then carefully positioned them approximated 15mm apart, the exact measurement is less important though if you are creating multiple sensors I would recommend making them the same gap to ensure consistency of measurements without having to individually calibrating each sensor.  I then used some hot glue (insulator) liberally at the top and at the bottom just enough to keep it in place during while pouring the plaster and while the mold solidifies.

metalinStraw

Now insert your secured metal probes into the straw, ensuring that both metal probes are equal distant from the sides of the straw.  The great thing about the wall hangers is they do this automatically due to their wedge shape at the top.  Once you have them centered apply gobs of glue to keep the probe in place but also to seal any gaps between the straw and the bottom of the straw.  This needs to be water tight since this will be the bottom our your mold.

image

Prepare the Plaster of Paris according to the instructions on the box.  On my box it said 2 parts mix to 1 part colder water.  Given the small size of the mold 1 tsp of mix and 1/2 tsp of water which gave you more than enough to make one sensor.  I used a bamboo skewer to stir since I would have gotten in trouble for trying to use our new silverware.

FillWithPlaster

Now it is time to pour your mold, depending on how steady your hands are you should be able to pour the plaster right into the top of the straw.  Fill about 1/4 of the length then tap the probe gently to help the plaster settle between the gaps.  Repeat the previous step until the straw is full.  If you have problems pouring you can also dip the skewer into the plaster and scrape it against the top edge of the straw.  This step is optionally but I wanted to give my sensor a little point so I carefully added plaster beyond the end of the straw to provide a sharp point.  Once you are done filling the straw, use your glue gun to secure the probe onto the paper you are working on and allow at least 1 hour to set.

FinishedSoilSensor

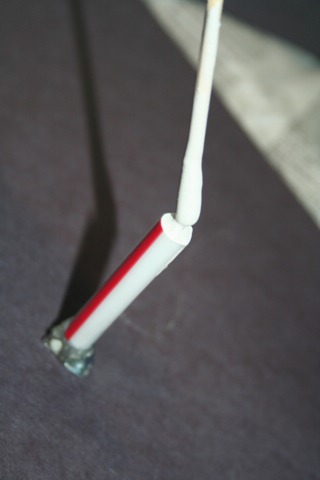
After about an hour you can remove the bottom part of the probe.  Do this by carefully cutting around the diameter of the bottom 3/4 of the straw, along with a lengthwise cut as shown in the lines marked above using a utility knife.  You must be very careful in your cutting going too deep can result in cracking the plaster and you need to start all over.

Allow the plaster to dry for 24 hours and it should be ready for testing.  With my probe it is essentially an insulator dry (beyond what my ohmmeter can measure) and a reading of 957 ohms when slightly damp which was a great range for measuring moisture level in my computerized grow box.

testing the cheap soil moisture sensor

Finally, I attached attach wires to my analog measuring device (in my case a PS2 Controller) and I started getting readings.  At this point you should calibrate the sensor by getting a reading with the probe dry then again when it is full saturated in water.  Ironically, the probe I made was almost exactly specifications as the one I re-purposed from a cheap commercial soil moisture sensor so I didn’t even have to modify the constants on the automated computerized grow box software.

Given you can make hundreds of these things with a regular sized box of Plaster of Paris, box of paper clips and a few trips to your favorite fast food restaurant.  The cost of each of these things would be pennies and given the cost of buying a commercial product seems like a very economical alternative.

How to determine your own personalized last frost date from local weather station

There was a discussion in comments on my previous average last frost post on how to determine an accurate last frost.  A great point was made by Daphne where every garden can have its own microclimate so the date you find online or in a book could be many weeks off for your microclimate in neighborhood.

To be able to predict your last frost date accurately it takes some history, if you have lived in your current residence and happened been capturing your temperature data accurately by memory or paper you may the information to predict your last frost date.

For people that are relatively new to their residence, like myself, I felt there I had very little information to determine an accurate prediction of my last frost date.  This was until I remembered Weather Underground which logs results of schools or private individual that register their weather stations.

After a quick search I was able to find someone who had a weather station in my neighborhood.  After doing a custom query of the full range of the of the weather station, which in my case was a little over 4 years, I had all the information I needed.  By carefully adding a horizontal line at freezing using a graphics program (Microsoft Paint) I could easily see where the low temperature dipped below the freezing mark.

tempChart

From a quick glance at the data it appears that the first week of April is a pretty safe date for past few years.  But if you look the the irregular low temperatures we have had this month this might be harder than I thought.

Now of course your neighbor may a different microclimate than you, but should get you in a better ballpark than the generic number you find fro your city.  You could always spend $500-$1000 on your own weather station to get some better accuracy, but for me seems close enough to me.  Though the weather station would be a really cool gadget to have.

Protecting your seedlings when your weather does not cooperate

IMG_0336

I like to push the envelope my luck when I decide to start seeds outdoors and this year is not an exception.  Just yesterday I posted about planting the rest of my outdoor seeds where karma responded with a freak snow storm and freezing temperatures.

I am not too worried about about the new seeds I planted since many have been sitting dormant in the refrigerator for almost 12 months so few more days in about the same temperature shouldn’t be too traumatic for the lettuce, carrots, and cilantro.

The plants I have concerns with are the spinach seedlings which have just started to break through the soil.  Fortunately spinach are pretty cold tolerant but weight of the snow on top of them is not a great way for them to start their time in the world.

After a quick search through the garage I found a great solution, a plastic storage tub, which fit perfectly over the irregular rectangular space I planted them.

IMG_0341

Tada.   If I wanted to get all fancy, I would add some holes for venting/etc but I chose to set a small cinder block on top and call it good.  After a couple days, I should be able to remove it until the next freak storms comes our way.

Stupid groundhog…

Update: This is what the tub looked like after a few minutes in the sun (instant humidome)

IMG_0343

Guest Post – Sustainability Through the Consumption of Things Conserved

I do not have too many guest posts but I thought this topic was so interesting I couldn’t refuse.  Though Dan specifically talks about purchasing more exotic foods for consumption but the very same principals can also be used when selecting species of plants to grow in your garden.

“In other environmental issues we tell people to stop something, reduce their impact, reduce their damage,” – US Ecologist Gary Nabham

Since the beginning of the green movement, there has been a rise in the number of organizations and businesses that are doing their part in the promotion of sustainability through conservation. As human beings, we’re told to reduce our carbon footprint, consume less unhealthy foods, and spend less time in the shower! But let’s take a minute to step back and look at this from a different perspective; one that Gary Nabham strongly suggests.

Gary Paul Nabham, phD., is a Arab-American writer/conservationist who’s extensive farming work in the U.S./Mexico borderlands region has made him world renown. Specifically speaking, Nabham is known for his work in biodiversity as an ethnobotanist. His uplifting messages and attitude towards life and culture has granted us access to multiple beneficial theories including his latest of eat what you conserve.

According to The United Nations’ Food and Agriculture Organization, about three quarters of the genetic diversity of crops been vanishing over the last century and that a dozen species now gives 90% of the animal protein eaten globally. In accordance, just 4 crop species supply half of plant based calories in the human diet.

Nabham claims that by eating the fruits and vegetables that we are attempting to conserve/save, we’re promoting the granular dissemination of various plant species. But this goes beyond what we typically buy in supermarkets, particularly because of price and abundance. We must remember to try new things and immerse ourselves in the very concept of diversity. Keep in mind; the benefits of splurging for that costly fruit/vegetable supremely outweigh the cons. Not only are you promoting biodiversity and further eliminating the needs of farmers to remove rare, less purchased crops off their agenda, but you’re also effectively encouraging healthier lifestyles.

Agriculturist Marco Contiero mentioned that “biodiversity is an essential characteristic of any sustainable agricultural system, especially in the context of climate change.”[ 1] With sustainable crop efforts being lead by the CGI (Clinton Global Initiative) and the IRRI (International Rice Research Institute) the duo plans to provide a more sustainable crop, untouched by natural disasters, much like the ones experience in Haiti and neighboring areas. Contiero goes on to state “We need to ensure this is the basis for the future…” — This is exactly what Doug Band, the CGI, and the IRRI are doing by engaging in sustainability efforts.

So remember, next time you’re in the supermarket picking out navel oranges or strawberries, turn your attention to something that’s a bit more “out of season,” or exotic in nature. The same goes for salads/salad ingredients; shop outside the norm, picking spices and vegetables that you wouldn’t normally incorporate into your everyday diet. During such economic downtime it isn’t always easy to maintain the same level of grocery shopping intrigue, but we must also not forget that in this sundry of foods we can find fun!

Dan Grifen — Supporter of all things green and progressive.

Protecting your transplants with window screens

037

Typically I do my best to give my plants some chance to harden off by reducing the low-end temperature of the grow box and bumping up the extended time the internal fan runs as well as letting them have a few hours out in real sun when schedule and weather permits.

Fortunately/Unfortunately eventually these plants have to venture out on their own.  To provide some protection to these plants for the first few days (or extended periods of very hot weather) it is best to provide screen to allow the plants to acclimate to actual sunlight.  Of course you can buy some netting screen but having a pretty small yard and even smaller garage this is something I do not want to pay for nor have to fold back up and search for again until it is needed again. 

My solution is to “borrow” the window screens from a couple windows I pretty much never open (behind my desk I am typing at now) this provides a good screen with a sturdy frame which as you can see I have simple rested against a fence…though if you did not have a similar structure you easily could use a couple bamboo poles or stakes to hold the screen up.

036

Great part after a few days or week you simply snap them back into your window where you will easily be able to find them next year…

How to keep cats out of your garden

Keep cats out of your garden

The Rise of the Cat

Today, cats have the distinguished honor of being the most popular pet in the world. They are extremely adaptable creatures and are found virtually everywhere on earth. Due to their rapid breeding rates, the cat population has swelled to an astonishing 60 million in the United States alone. This figure includes household cats, as well as the ever-increasing number of strays.

There are many reasons this figure has exploded. One reason is cat owners are failing to spay and neuter, resulting in unwanted litters. Another reason is abandonment. Cat owners are abandoning their pets because of relocation, not being able to afford the cat, or even downright neglect. (Cats)

Identifying Cat Damage

The sheer volume of stray cats has become an expensive nuisance to homeowners, as cats cause damage to landscaping, lawns, gardens, and ponds. Cats use gardens as their litter boxes, destroying plants and seedlings as they dig. They damage trees with their excessive clawing. And they leave a repulsive smell in yards by marking and spraying. Also, cats are instinctive hunters. Their flexible bodies, quick reflexes, acute hearing, and sharp retractable claws make them perfect predators for locating and catching prey, especially small mammals, birds, amphibians, and fish. Those with decorative ponds have problems with felines feeding on their fish.

Dangers of Strays

One in ten animal bites come from the infamous feline. Besides pain, cat bites can have dangerous ramifications. Humans can contract infections, such as cat-scratch disease, salmonellosis, tulermia, and rabies. Their feces can transmit toxoplasmosis, which can pose a serious danger to pregnant women and immunosuppressed individuals. In fact, a considerable percentage of domestic and stray cats are carriers of the Toxoplasma parasite, which can cause lasting effects and even fatality in humans. With these potential health threats, finding an effective cat repellent to keep strays out of yards has never been more important. (Toxoplasmosis)

Cat Repellents — Keep Out Cats?

To keep cats out of your yard, you need to find an effective cat repellent. There are several common strategies for keeping cats out of an area, but they are not all highly effective. For instance, some will try positioning a sandbox and catnip a distance from their home to draw them away. However, cats have a large roaming radius. A sandbox and catnip will be a welcome sign to the area, not a cat repellent for your yard.

Cats won’t walk on bristly items. This cat quality has been helpful to those homeowners with areas of fallen pinecones and needles. However, spreading these all over your yard isn’t an easy cat repellent method.

Fencing alone will not keep cats out. Cats have lithe bodies that squeeze through small places and surmount tall obstacles. If you have a fence, you should combine your efforts with an effective cat repellent.

What is the best method for keeping strays and feral cats at bay? Water is nature’s very own cat repellent. Cats hate being wet, which you can use to your advantage. Based on the fact cats hate water, the motion detector sprinkler has been refined for use as a highly effective cat repellent.

Motion Detector Sprinkler — An Effective Cat Repellent

A motion detector sprinkler is similar to a water sprinkler, but instead of running continuously, it fires a burst of water to harmlessly frighten cats away. It’s a clean, harmless, and effective cat repellent that sets up quickly and easily. Simply install a standard battery, connect the sprinkler to a hose, and stake the unit into the ground. Because it runs 24 hours a day, a motion detector sprinkler is the perfect solution to these nocturnal predators.

These cat repellents should be placed in the area that has experienced cat damage. Putting a motion detector sprinkler by a decorative pond will prevent felines from feeding on the fish. Installing one in your garden will not only nourish your plants, it will also put an end to the digging and litter box smell.

You should also install these cat repellents in the pathway where they search for food and water. You’ll stop them from entering your yard and reaching your pets’ dishes, decorative ponds, bird baths, and gardens.

The Power Behind the Motion Detector Sprinkler

A motion detector sprinkler has an infrared sensor, which can sense movement up to 35 feet in front of the unit. When motion is detected, the sprinkler will eject a sudden jet of water accompanied by a “whoosh” sound. This combination works as a highly effective cat repellent by creating a negative experience for the trespassing animal. They will be conditioned to avoid the area in the future.

The most effective motion detector sprinklers feature adjustable sensitivity detectors and random spray patterns, meaning cats won’t become accustomed to the jets of water. With over 1000 square feet of coverage from one unit, these cat repellents offer widespread protection. To cover more area, simply install more than one sprinkler. Not only will you have an effective cat repellent, you’ll also be protecting your yard from other unwanted animal guests, such as deer, dogs, raccoons, groundhogs, opossum, skunks, rabbits, squirrels, and birds.

Types of Motion Detector Sprinklers

Most motion detector sprinklers are eco-friendly, using only 2-3 cups of water per activation. Infrared proximity and pivoting sensors offer 180 degrees of protection, never missing an animal that ventures within reach of the unit. High-tech systems have the added benefits of remote functionality, timer options, and a sprinkler mode. Solar-powered models utilize a refillable basin for their water supply, making them hose-less and relocatable. (Havahart Spray Away)

Works Cited

Cats. 19 January 2011.

Toxoplasmosis. 2 November 2010.

Havahart Spray Away – Motion Activated Water Repellent. 19 January 2011.

Guest Post By: Havahart®

IKE