Search Results

Tips for Getting Started with Year-Round Gardening

image

As many of us grow more environmentally conscious and feel an increased concern about exposure to chemicals and toxins, one appealing option for wrestling back control over what goes into our systems is to grow our own fruits and vegetables. However, the steps involved in planting, maintaining, and harvesting a successful crop can feel daunting, especially to those of us who have had trouble keeping household plants alive in the past.

The key to overcoming this anxiety is simple: by employing a few simple techniques, planning ahead and creating a manageable chart of necessary activities, it will be easy to keep your garden blooming year-round.

Step One: Decide What to Plant and When

Because you’re going to be a year-round gardener, any time is a good time to figure out which plants to grow in the coming season. Which ones you choose will be dependent to a large extent on where you live.  Different vegetables thrive at different times of year and in different climates.  Consult your local gardening organization or gardening center for advice concerning which crops are most advisable for your particular location.

Certain hardy crops can be planted as early as February, while warm season crops should generally go into the ground after the last average frost date. By late summer, you can plant crops for your fall garden – these should go in at least two months before you expect the earliest fall frost. Certain crops like garlic and onions can be planted as late as October!  The key is to keep planting throughout the year, so that you can also harvest vegetables year-round.

Step Two: Create a Gardening Chart

Create a gardening calendar with sections for each month of the year. Here is an example of a basic planting guide that was prepared for gardeners in Central Arkansas: http://www.uaex.edu/Other_Areas/publications/PDF/FSA-6062.pdf. Another example focuses less on which vegetables to plant in which month and much more on the activities that are needed to maintain a garden: http://www.humeseeds.com/projndx.htm.

A different option is to create a chart with rows for each month and columns for different types of things to do in the garden. For example, you could have a column for planting, another for maintenance activities, and one for harvesting. This means that for April, you could look at column one to see which plants to put in the ground, column two to see how often to water or fertilize them, and column three to check on which plants should be ready to be harvested.

Step Three: Use Techniques That Enable You to Extend the Growing Season

There are many methods of extending the growing season of your garden. Three basic ones that will be discussed here are:

  • Raised bed gardening
  • Planting seeds indoors
  • Plastic-covered tunnels

Other options you might wish to explore include cloches, cold frames, underground greenhouses, and solar-charged hot water bottles.

To begin with, raised bed gardening offers several advantages. In particular, raised beds allow you to extend the gardening season because the soil will warm up earlier, meaning you can start growing crops sooner. Additionally, because the beds are raised off the ground, it is not as difficult to work on the garden in rainy weather. This type of garden also typically offers higher yields and better soil.

Raised bed gardens even require less water and generally contain fewer weeds. You can purchase or build raised beds, or even create them by shaping rectangular mounds of soil a few inches above the ground level so that they are wide enough to reach across. However, make sure to use sufficient mulch to keep the soil in place if it rains heavily.

Next, planting seeds indoors allows you to multiply the number of planting seasons available to you. Instead of winter, spring, summer, and fall, you will have early spring, mid-spring, late spring, summer, early fall, late fall, and winter. By starting the plants inside and only moving them to the garden when other plants are harvested, you can make use of more limited space. The key is having a firm plan for garden layout and crop rotation.

Finally, this technique can be supplemented by using plastic-covered tunnels for mini-greenhouses. Not only will this allow you to plant earlier in the spring, it also provides a place to harden the tender seedlings you have been growing indoors while you are waiting for space to open up in the garden. You can use fence wire to support the tunnels; another option is to use hoops cut from wood, wire, or pipe. In addition, cover the tunnels with blankets or tablecloths when it is especially cold and cut V-shaped vents in the sides in order to improve ventilation.

What vegetables would you like to grow in your garden? Have you had success with year-round gardening in the past?

Since 2000, Chris Long has been a store associate at a Home Depot in Illinois. He also contributes to the Home Depot blog, and provides raised bed garden advice as well as tips on other home landscaping topics.

How to make your own cheap weather station

image

Though the prices for personal weather station have dramatically dropped (around $100) over the past few years, I decided to work on making my own. The primary measurement I wanted was temperature given this is the specific one that could be dramatically different from my neighbors (or neighborhood weather station) given the many unique microclimates your yard can have.

Step 1: Create an account and weather station at Weather Underground. This will allow you a place to view your weather station results as well as a permanent storage location for your data. After you have created your account it is really easy to create a weather station after clicking this link you just need to enter some basic information such as address and time zone click “Submit” and you have yourself a weather station. Now this is not very exciting unless data is being updated so we will look at this next.

image Step 2: Get some data. Hear is a point where you can go all out with every weather measurement sensor imaginable, though if this was your intent I would recommend saving some money and getting a personal weather station, but in my case all I really wanted to track was the outdoor temperature. To get this temperature I used a DirectTemp USB waterproof temperature probe from Quality Thermistor, Inc. All you need to do is plug this into an open USB port and with some simple serial communication you can start getting temperature results. This can easily be done using a language like C# with just a few lines of code:

SerialPort serialPort = new SerialPort(“COM5”, 9600); serialPort.Open(); serialPort.WriteLine(“2”); double responseValue = Convert.ToDouble(serialPort.ReadLine()); serialPort.Close();

You could also use something similar to my homemade waterproof digital thermometer and an arduino to get your outside temperature.

Step 3: Log your results. WeatherUnderground makes submitting data to them very easy. All that is required is a specially formatted query string request which you could do in any internet browser…though updating this manually every 5 minutes would be very tedious this is how can do this also using C#. All that is required is to replace the “ID” with your weather station created in Step 1 and your password used when you created your account.

string submitUrl = “http://weatherstation.wunderground.com/weatherstation/updateweatherstation.php?action=updateraw&ID=KWAREDMO38&PASSWORD=[password]&”; submitUrl += “dateutc=” + DateTime.UtcNow.ToString(“yyyy-MM-dd hh:mm:ss”) + “&”; submitUrl += “tempf=” + GetOutdoorTemp(); // Using code above WebClient webClient = new WebCLient(); webClient.DownloadString(submitUrl);

Now by calling the above code every 5 minutes using an infinite loop with some delay you can now log your temperature results and have current and historical data to have some better info to better guess your first/last frost dates or when it is safe to bring out your tender seedlings you are growing indoors.

Step 4 (optional): Leverage external weather data. As you may have noticed my weather station has more weather data than just temperature. I did this by leveraging (nicer word than stealing) some data from a weather station at a school in my neighborhood. Now this is not quite as accurate as if I was getting this information from my backyard…it is pretty safe to assume that the humidity, rain, and wind velocity and direction should be pretty much in the same ballpark. The process is pretty simple here where I extract this from a request to the external weather station and include these into my submission, which you can see in the code sample below.

   1: using System;

   2: using System.IO.Ports;

   3: using System.Xml;

   4: using System.Net;

   5:

   6: namespace WeatherStation

   7: {

   8:     class Program

   9:     {

  10:         private static WebClient webClient = new WebClient();

  11:

  12:         static void Main(string[] args)

  13:         {

  14:             while (true)

  15:             {

  16:                 SubmitWeatherInfo();

  17:

  18:                 System.Threading.Thread.Sleep(300000);

  19:             }

  20:         }

  21:

  22:         public static void SubmitWeatherInfo()

  23:         {

  24:                 string submitUrl = "http://weatherstation.wunderground.com/weatherstation/updateweatherstation.php?action=updateraw&ID=KWAREDMO38&PASSWORD=[password]&";

  25:                 submitUrl += "dateutc=" + DateTime.UtcNow.ToString("yyyy-MM-dd hh:mm:ss") + "&";

  26:                 submitUrl += "tempf=" + GetOutdoorTemp() + "&";

  27:                 submitUrl += GetExternalWeatherData();

  28:

  29:                 webClient.DownloadString(submitUrl);

  30:         }

  31:

  32:         private static double GetOutdoorTemp()

  33:         {

  34:             SerialPort serialPort = new SerialPort("COM5", 9600);

  35:             serialPort.Open();

  36:             serialPort.WriteLine("2");

  37:             double responseValue = Convert.ToDouble(serialPort.ReadLine());

  38:

  39:             serialPort.Close();

  40:

  41:             return CelsiusToFahrenheit(responseValue);

  42:         }

  43:

  44:         public static double CelsiusToFahrenheit(double temperatureCelsius)

  45:         {

  46:             return (temperatureCelsius * 9 / 5) + 32;

  47:         }

  48:

  49:

  50:         private static string GetExternalWeatherData()

  51:         {

  52:             string externalWeatherStation = "http://api.wunderground.com/weatherstation/WXCurrentObXML.asp?";

  53:             externalWeatherStation += "ID=[ExternalWeatherStationId]";

  54:

  55:             XmlDocument xmlDoc = new XmlDocument();

  56:             xmlDoc.LoadXml(webClient.DownloadString(externalWeatherStation));

  57:

  58:             string externalData = "&winddir=" + xmlDoc.SelectSingleNode("//wind_degrees").InnerText;

  59:             externalData += "&windspeedmph=" + xmlDoc.SelectSingleNode("//wind_mph").InnerText;

  60:             externalData += "&windgustmph=" + xmlDoc.SelectSingleNode("//wind_gust_mph").InnerText;

  61:             externalData += "&baromin=" + xmlDoc.SelectSingleNode("//pressure_in").InnerText;

  62:             externalData += "&humidity=" + xmlDoc.SelectSingleNode("//relative_humidity").InnerText;

  63:             externalData += "&dewptf=" + xmlDoc.SelectSingleNode("//dewpoint_f").InnerText;

  64:             externalData += "&rainin=" + xmlDoc.SelectSingleNode("//precip_1hr_in").InnerText;

  65:             externalData += "&dailyrainin=" + xmlDoc.SelectSingleNode("//precip_today_in").InnerText;

  66:

  67:             return externalData;

  68:         }

  69:     }

  70: }

Growing Vegetables in the City

Urban Garden

The days when city dwellers had no hope of growing their own vegetables are rapidly becoming a thing of the past, as urban farmers discover ever more ingenious ways to squeeze growing space into the most compact area. Window boxes, balcony planters and even blank walls can be put to good use as growing space for healthy and economical vegetable production, and the beauty of a tightly contained ‘garden’ is that the environment can be strictly controlled, ensuring that pests are kept away and no harmful chemicals creep into the organic compost or soil.

Legumes thrive in planters and can stand being planted quite close together. Even a relatively short planter, of approximately 70cm to 1m can yield enough beans or peas to feed a family every other day for the duration of the harvest season. Providing a climbing frame for these vegetables will give the plant greater height, which will allow a bigger yield of tasty and nutritious vegetables for your table.

Carrots lend themselves well to being grown in a container. If the pot or planter is relatively shallow, it would be advisable to choose ‘dwarf’ varieties which tend to be shorter. Carrots must be sown thickly, with about a 5cm covering layer of soil or compost, and then thinned out once they have sprouted to be sure each carrot has enough room to grow out.

Cucumber

Cucumbers, eggplants and melons can all be grown in a rooftop or balcony garden but all of these plants require a fairly generous and deep container. As a rule of the thumb a half-barrel, or two motor-vehicle tires laid one on top of the other is the sort of space needed, so growing these plants will very much depend on the space available to our bijou gardener. Cucumbers and melons, particularly, need space to spread, being ground-creepers that are not easily able to climb. Attention must be paid to the fruits as they grow, they often sit on the ground which means they can be prone to insect depredation and rotting. An eggplant forms a rather attractive bushy plant which can be very decorative, the effect being enhanced when it has a couple of the shiny purple fruit forming.

tomato1-584x389

Tomatoes are very versatile and will grow under most conditions. The bigger varieties need a large deep pot, and a stake to keep them upright once they have reached maturity. Smaller types of tomato, like the cherry tomato can even grow in very small pots, but in general, the larger the pot and the plant, the higher the yield and the longer the growing season will be. Tomatoes must not be allowed to sit in standing water as this can cause the plant to start rotting away.

Lettuce

Lettuces adore being grown in pots and planters, they positively thrive in that situation, mainly because it is very much easier for the gardener to ensure that the lettuces are in the right environment for optimum growth. In general, growing lettuces can be as simple as sprinkling in some seeds, making sure the soil stays moist and getting ready for a healthy feast as they grow to full size. Lettuces in a garden bed can be tricky as too much water is dreadful for them, causing the plants to rot, while not enough water creates a small bitter-tasting leaf. Planters generally have drainage holes at the bottom which automatically maintain the moisture level of the soil, taking some of the guesswork out of proceedings.

Many species of vegetable can be grown in pots and containers and the best advice would be to try one or two specimens and see how they do. Organic vegetables may benefit from fish or blood-and-bone meal fertilizers to give them a boost, but if you are using any of the patented organic composts that are readily available at gardening centers and DIY shops you may not need to add any extra nutrients to the soil. Organic produce is easily protected from insects, parasites and diseases when it is grown far from other plant-life, a boon to the urban vegetable grower.

herbs-in-pots.jpg

If you are strapped for space, but desperate to grow food or flowers, have a look at your window-sills with a view to fitting in a window-box, examine hidden corners to see if there is space for a deep planter or a strawberry pot, and even study the walls of the outside of your house or flat: vertical gardening is becoming fashionable, with pots and planters being layered up a wall to make maximum use of the space available. As long as you have a space that attracts at least six hours of sun per day, you too can become an urban gardener!

AUTHOR: Thomas Jones is a keen gardener, renovator and DIY enthusiast. Having lived and worked in the city, he’s learnt a few tricks on how to grow good produce. Thomas currently works with Falcon Pools.

Rooftop garden image Source: http://www.bucolicbushwick.com

Getting some great deals on gardening supplies

002

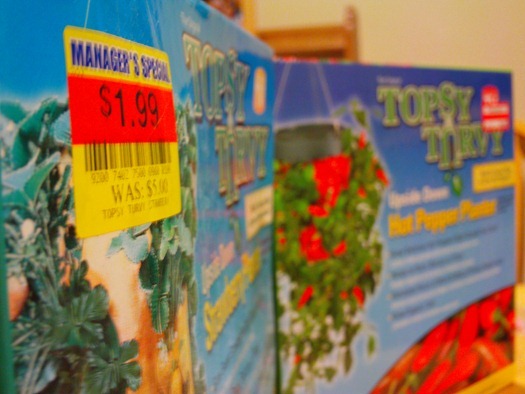
With stores making way for Halloween and Christmas decorations, now is the perfect time to find some great closeout deals at your local grocery store or garden center.  I had meant to imitate the Topsy Turvy planters above, but at 60-70% off I was not even cheap enough to pass up on these deals for the Topsy Turvy Strawberry Planter (picked up two at $1.99 each) and the Topsy Turvy Hot Pepper Planter (picked up one for $4.99)

003

Given my desire to grow even more peppers next year the pepper planter will work great to try out a few new plants.

004

And no, there was nothing wrong with camera on the picture above that’s what the boxes actually look like.  I combination of too much sun and then getting heavily rained on over the past couple weeks led to an even bigger discount.  Hoping to fill these with the strawberry runners that are trying to escape their garden bed.

So head down to your local garden center and check out those items you have thought about but never pulled the trigger, you just might find a deal you are glad you did not miss out one.

If you found any good deals, I would love to hear about it in the comments…

Free tomato seeds

TomatoIf you head over to Campbell’s Help Grow Your Soup site you can get some free tomato seeds and while you are at it vote for a barn which Campbell’s will give $250,000 to restore.  So free seeds for you and one dollar for a barn restoration.

Testing your garden soil

Soil Test 

I always am good about amending my soil whether it is grabbing a bag of spent coffee beans from Starbucks whenever I notice them there, few handfuls of alfalfa pellets at the beginning of spring, or compost when it becomes ready in my bin.  the thing I neglected to do was actually test my soil to see how I am doing.

The process to do this is actually pretty simple.  You first start by getting a sample of your soil.  If you have a very large garden it is a good idea to take multiple samples and mix them together for a single combined sample.  What I decided to do was prepare my soil as if I was going to plant some seeds (turn up the soil with a claw, smooth it out, etc) then I took a sample about 6-7 inches deep and placed it in an old container than I am pretty sure held baby spinach.

Bucket of dirt

Next comes the fun sciencey stuff, for the pH test you fill one of the cylinders to the first line with soil, add contents of one of the “green” capsules and fill to the fourth line with filtered/distilled water and shake vigorously.

Soil test vial

For N/K/Potash tests the process is somewhat similar where you take one part soil to 4 parts water.  For this I grabbed an old juice container from the recycling bin.  Added the appropriately measured parts and shook for a good couple minutes, which was much more of a workout as the tiny vial…  I then let the soil settle and came back 10 minutes later to see perlite floating on the surface and the water still a bit cloudy…think it was the coffee ground…

Soil test materials

I then took a tea strainer, which I am pretty confident I have never used for straining tea, and poured some of the slightly cloudy water into a clean container to remove the perilite.  I then filled each of the files to the appropriate (4th) line and added the color coded capsules to each of the vials.  After 10 minutes of waiting I had my results…

Soil Test Results

So here is what I discovered:

  • pH: Pretty much perfect, basically neutral maybe a bit on the acidic side but good range for most all vegetables
  • Nitrogen: Though this shows a little color it started out a bit on the brown side so really this was almost no change so appears even with my amendments I am still very low on nitrogen.
  • Phosphorus: Basically off the charts no need to add an more here…
  • Potash: This one looks decent, probably could amend some here but really something I am worried about.

So for me this quick $4 soil test brought me some great information and will plant to give my garden some additional nitrogen boosts throughout the season.


IKE