How to repot tomato seedlings
14 years ago indoor seed starting, repot, seedling, tomato
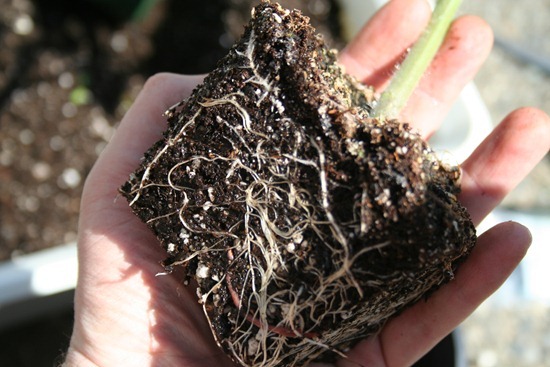
When growing tomatoes from seed you are going to have to repot them. The basic idea is you never want to stress the plant out by restricting the roots from getting wider. Fortunately the process to do this between the various growth states is pretty simple and does not really change much between repotting.
The first time you will need to repot them to a 4 inch put when the seedlings you initially planted get about 4 inches tall using the same steps I mention in detail below.
Once the tomato plant begins to grow wider than the pot (I was a couple weeks late below) or about 7-8 inches tall this is a good time to move up to a gallon planting container.
Now you may be asking, “Hey Mr. Cheap Vegetable Gardener, those fancy generic nursery containers are expensive. I have seen them for almost $2.00 each at my local home improvement store.” Funny you asked, I picked up a bunch of these while going for a walk with my kids that someone dumped as garbage…so I stocked up.
Step 1: The Soil: Given I have quite a bit more volume to fill I modify my seedling mixture from 2 parts coconut coir (or peat moss) and 1 part perlite to 1 part coconut coir (or peat moss), 1 part perlite, and 1 part soil from my garden. This is for no other reason other than I am cheap and bagged soils can be expensive. I also add a thin layer of bone meal and a little sprinkling of eggshells to provide a boost of calcium and Phosphorous. I also add a little water to and mix until well incorporated
Step 2: Fill the bottom: You are only going to want to put about 1.5 inches of soil in the bottom of your 1 gallon nursery planter. I will explain why we are putting so little shortly.
Tomatoes have a special ability to grow roots out of its stem due to the fact that it has these little white hairs growing out of it (see below) When these are planted below the surface it will allow you to make a much stronger root system to your plants and a much more vigorous tomato plant.
Step 3: Remove leaves from plant: To take advantage of extra root growth and any leaves that will be buried are not going to help the plant anymore so remove this with knife/pruners or your fingernails in a pinch (pun intended)
Step 4: Remove plant from previous container: Tomatoes are pretty tough for transplanting but you do want to take some care to not shock the plant during this removal. It advisable for the roots to be moist but not soaking wet so the root ball comes out easily but not so wet that all the supporting dirt falls away when removed. If you have some problems removing the plant try gentle inserting a butter knife around the edges to loosen its grip.
Step 5: Fill with soil: Fill the plant all the way to the top with soil pack down lightly and repeat until you have some firm soil up to the top of your plant.
Step 6: Stake your plant (Optional). If your plant is looking a bit unstable like the one above I like to take one of the cheapest bamboo stakes I can buy (sticks from the yard would also work) and cut them to 12 inch length and press them about 1 inch away from the plant. Now simply attach with whatever you can find handy close to you. Some classics are plant tie tape, twist-ties, reusable Velcro straps, yarn, and twine. Today I happened to find a piece of yarn on the floor of my garage and a couple zip ties so I put them to good use. You want these tight enough to support the plant but still loose enough to allow the plant to grow.
No matter how careful you are the plant will go through some shock during this ordeal and probably will look a little sick for a day or two but should bounce back shortly after that and continue expanding with its newly added space.


14 years ago
What a timely article we must live in the same climate. 🙂 This is a very timely article as my tomato plants are at least 4″ tall and need to be repotted in the grow box, the one problem is that I am almost out of room in the grow box. 🙁
14 years ago
I am having the same problem in mine…need to start doing inventory of what I really can plant in my yard this year and giveaway/compost the extras. Sad to do but either that or put them outdoors now which they are sure to be goners.
14 years ago
So CVG, I’m in a similar area to yours (Vancouver, BC) – do you figure that the May 15th weekend will be ok for our tomato plants to go in the ground?
14 years ago
Thats when I was planning but the with the unusually cold weather we have been getting this year I am thinking about trying to hold out until the beginning of June…but if we see a sudden change in temperatures and a 10 day outlook that looks promising, I might be convinced otherwise.
14 years ago
Great thanks, I was thinking the same, and noticed the forecast is not showing amiable temperatures till June 1st. We had hail today, for goodness sakes.
I did a blog post this week on the state of the items currently in the ground if you’d like to see your northern neighbour’s garden. 🙂
14 years ago
Very nice tutorial! I just did this with my extras so that I can sell them at a home plant sale.